Hooks Revisited: useContext
Putting things in Context
Context is one of my favorite React APIs and has a wide variety of uses cases. I’ve previously written about redoing a search UI using refs and Context, as well as how to use the useRef hook. This time around, we’re going to cover the useContext hook, which is now the way we use Context in function components.
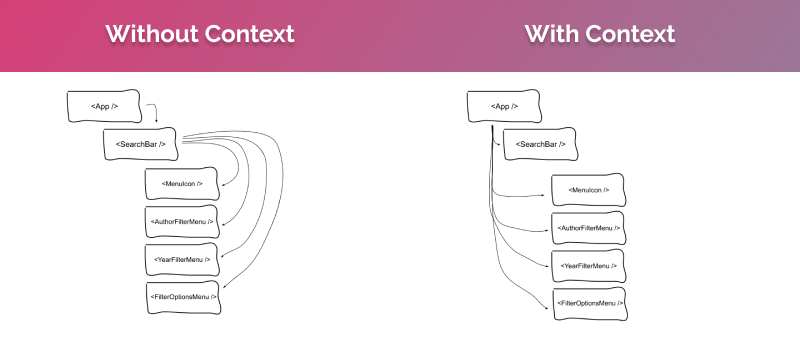
I love the Context API because it allows you to compartmentalize aspects of your app’s data within a sub-tree of components. Essentially, your child components can access data via the value prop provided by the Context.Provider. You can think of this like a store that’s specifically scoped to this tree. The components wrapped by the Provider can choose whether or not they want to consume the data (i.e. Consumers) at all, which means you can avoid prop drilling. Here’s a rough illustration:

In class components, we used a combination of Context.Provider and Context.Consumer tags to set up the relationship described above. However, in function components, the Context.Cosumer syntax has been replaced with the useContext hook.
For context (no pun intended), the snippets below show these two implementations of the same Context. Despite the syntax difference, the functionality is identical.
function NestedComponent() {
  return <AppContext.Consumer>{(value) => <p>{value}</p>}</AppContext.Consumer>;
}

export default class App extends React.Component {
  render() {
    return (
      <div className="App">
        <AppContext.Provider value={"Hello from App 👋"}>
          <ChildComponent>
            <GrandChild>
              <NestedComponent />
            </GrandChild>
          </ChildComponent>
        </AppContext.Provider>
      </div>
    );
  }
}
Anatomy of useContext
The useContext hook takes one argument, a Context object, and provides access to the values from the nearest Context.Provider above it in the component tree. Any component consuming data from the Provider will always re-render any time one of the values changes.
const AppContext = React.createContext();

function NestedComponent() {
  const appContext = useContext(AppContext);
  return <p>{appContext}</p>;
}

function App() {
  return (
    <div className="App">
      <AppContext.Provider value={"Hello from App 👋"}>
        <ChildComponent>
          <GrandChild>
            <NestedComponent />
          </GrandChild>
        </ChildComponent>
      </AppContext.Provider>
    </div>
  );
}
Notice that even though we’re using the seContexthook, the way we define our context and rovideris exactly the same as our lassexample above. The provider works the same no matter which of the following consumption syntaxes you’re using:
- useContext
- Context.Consumer
- Class.contextType
In practice
In the sandbox below, I have built out a component tree that represents a self-contained search widget using the earchInputcomponent we built in an earlier article covering the seRefhook.
For the purposes of this demonstration, we are mimicking an API call by loading data about breweries in Philadelphia from esults.jsondirectly into our earchcomponent and displaying them as esultCard in the earchResultscomponent. Then, whenever the text value in earchInputchanges, we filter our results to breweries who have names containing a string matching the input text.
Try it out for yourself below:
In Search, we have created a SearchContext by using React.createContext(). By doing this, we will be able to pass down context values to SearchResults and SearchInput without having to prop drill through our SearchWidget component. While we would only be passing props through one additonal component in this example, think about how effective this strategy would be for components nested even further!
To provide values to the children of Search, we are using the SearchContext.Provider to pass data via the value prop. We’ve constructed and are passing an object that has two values:
- results - An array of objects representing breweries
- setInputValue - The setter function from the useState hook in Search that we’re using to store the text value from SearchInput (i.e. inputValue)
With the Provider set up, any of Search’s descendant components can consume our context values using useContext.
const context = useContext(SearchContext);
In SearchInput, we use the setInputValue function passed down via our context to set the state of inputValue in Search whenever the user enters text in the input.
function handleInputChange(event) {
  context.setInputValue(event.currentTarget.value);
}

<input
  onChange={handleInputChange}
  ref={inputRef}
  type="search"
  className="SearchInput__input"
/>;
By elevating this state to the Search component, we are able to use its value to filter our apiResults and pass down a new array (i.e. results) to the SearchResults component, which renders each item as a ResultCard.
Essentially, Context allows us to more easily centralize related logic and create a good data management system for this self-contained subtree of components. Theoretically, we could repurpose this widget pretty easily by using different API data and updating a few prop names. Pretty cool!